TL;DR:
- High-quality, compliant photo galleries build trust and drive client bookings.
- Proper consent, consistent equipment, and strict editing are essential for legal and credible images.
- Integrating galleries with marketing and reputation management enhances overall med spa growth.
Picture this: a potential client is scrolling through three different med spa websites late on a Tuesday night. Two of them have blurry, inconsistently lit before-and-after photos with no context. The third has crisp, clearly labeled, professional images with disclaimers and treatment names attached. She books a consultation with the third one before she even reads a single sentence of body copy. Your photo gallery is often the first real trust signal a prospective client encounters, and most med spas are leaving serious revenue on the table by treating it as an afterthought.
Table of Contents
- What you need before you start: tools, staff, and permissions
- Step-by-step photo capture: achieving clinical, consistent images
- Storing, organizing, and editing images: legal and practical steps
- Building and showcasing your gallery: design and marketing essentials
- A smarter approach to compliant med spa photo galleries
- Effortlessly upgrade your med spa photo gallery experience
- Frequently asked questions
Key Takeaways
| Point | Details |
|---|---|
| Obtain legal consents | Always get written authorization before using any client photo for marketing. |
| Use clinical photography standards | High-quality, consistent equipment and setup create trust-inspiring results. |
| Edit and organize responsibly | Only make basic adjustments and store images securely to stay compliant. |
| Showcase for maximum impact | Display before-and-after galleries front and center for higher engagement. |
What you need before you start: tools, staff, and permissions
Now that you know what a great photo gallery can do for your brand, let’s start with the essentials. Before you take a single photo, you need to lay the groundwork. Skipping this step is how med spas end up with legal exposure, inconsistent archives, and photos they can never use publicly.
Legal consent is non-negotiable. HIPAA written authorization for using patient photos in marketing must be separate from treatment consent, must specify the usage platforms, and is revocable at any time. That means a patient who signed a general treatment consent has not given you permission to post their photos on Instagram. You need a separate, specific form that clearly explains where the photos will appear, who will see them, and how the patient can revoke that permission later. Build this into your intake process so it never gets missed.
“Patient photo release forms should explicitly name each platform where images may appear, the duration of use, and the process for revocation. Vague or bundled consents are a common compliance failure point.”
Your equipment list matters more than most owners realize. Clinical photography standards call for DSLR or mirrorless cameras, tripods, ring lights or twin-flash setups, fixed lenses, and color reference cards. A color reference card helps ensure that what your camera captures accurately represents the patient’s skin tone, which protects you legally and makes results look more credible.
Here’s a quick overview of what you’ll need:
| Category | Recommended item | Why it matters |
|---|---|---|
| Camera | DSLR or mirrorless | Sharpness and manual control |
| Lighting | Ring light or twin-flash | Even, shadow-free illumination |
| Stability | Tripod with adjustable height | Consistent framing across sessions |
| Lens | Fixed 50mm or 85mm | Avoids distortion of facial features |
| Color accuracy | Reference card | Ensures true skin tone representation |
| Background | Neutral gray or white backdrop | Removes visual distractions |
Designate a team member responsible for photography. This doesn’t have to be a full-time role, but it does need to be consistent. Rotating who takes photos without clear guidelines guarantees inconsistent results. Choose one or two staff members, train them on your setup, and give them a written protocol to follow every time.
Pro Tip: Create a centralized digital folder or binder that holds all consent forms, photo logs, and equipment checklists. When every team member knows exactly where to find and file this information, compliance becomes a habit rather than a scramble.
Investing in strong visual content for client engagement isn’t just a marketing strategy. It’s a foundational business practice that protects your reputation and drives measurable results.
Step-by-step photo capture: achieving clinical, consistent images
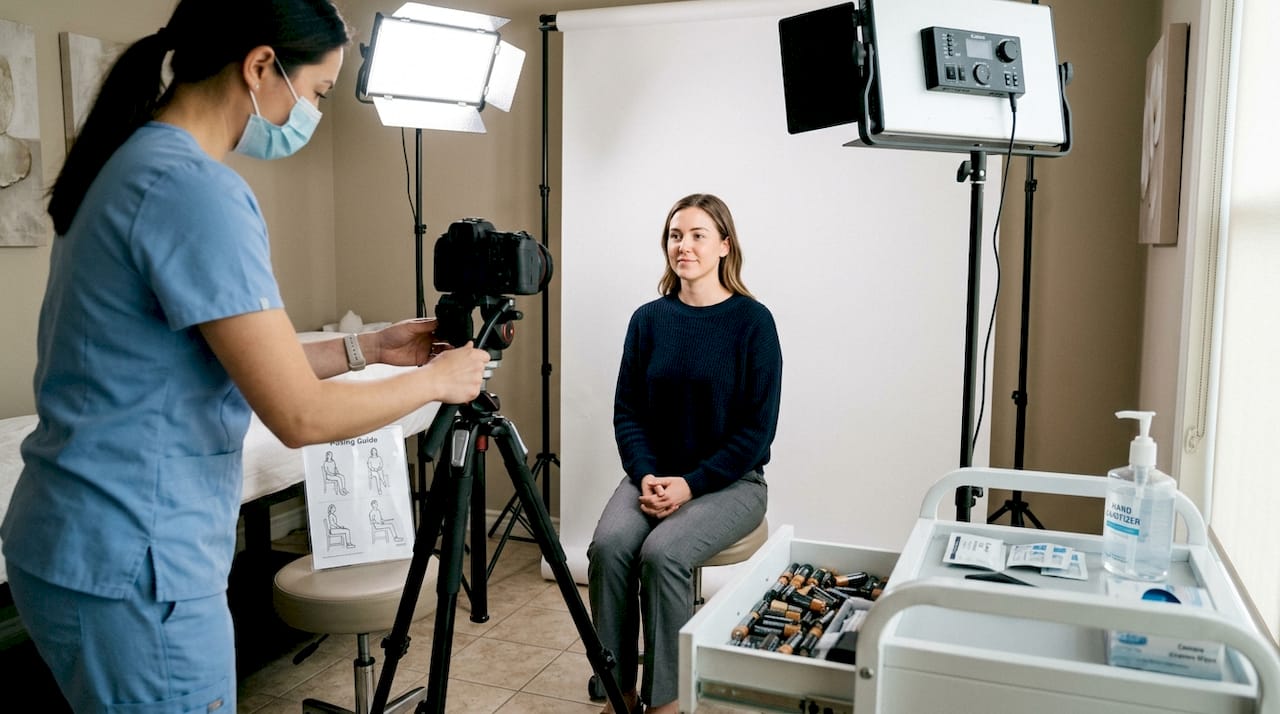
Once you’re prepared and have all your tools, it’s time to start capturing high-quality images. The physical setup of your photo station is just as important as the camera you use. Inconsistency in lighting angle, background color, or patient positioning can make two photos of the same person look like they came from completely different clinics.
Follow this step-by-step process every single time:
- Set up your photo station. Position your backdrop flat against the wall with no wrinkles. Place your ring light or twin-flash at the same height and distance you will use for every session. Mark the floor with tape to show exactly where the patient stands or sits.
- Calibrate your camera settings. Use manual mode to lock in your aperture, shutter speed, and ISO. Shoot in RAW format if possible so you retain editing flexibility without losing image quality.
- Welcome the patient and explain the process. Let them know exactly what you’re capturing and why. This builds trust and ensures they cooperate with positioning.
- Photograph with the color reference card first. Take one shot with the reference card in the frame before capturing any patient images. This gives you a calibration point when editing.
- Capture all required angles. For facial treatments, this typically means front, left three-quarter, right three-quarter, and profile. For body treatments, adjust accordingly. Always capture the same angles before and after.
- Log the session immediately. Record the patient’s ID number (not their name), the treatment, the date, and the angles captured. This log is your chain of custody for the image.
- Transfer files to secure storage the same day. Never leave photos sitting on the camera or an unsecured device overnight.
Clinical photography for med spas recommends using fixed focal length lenses specifically to eliminate distortion. A wide-angle lens can make noses appear larger or jawlines appear narrower than they really are, which misrepresents results and creates legal risk.
Manual vs. automated photo solutions: which works better for your practice?
| Feature | Manual photo setup | Automated photo system |
|---|---|---|
| Upfront cost | Low to moderate | Higher |
| Consistency | Depends on staff discipline | Built-in |
| Speed per session | Slower | Faster |
| Best for | Smaller practices | High-volume clinics |
| Learning curve | Moderate | Low once configured |
According to research on conversion rate optimization, visual consistency in before-and-after content meaningfully increases perceived trustworthiness, which directly affects how many website visitors convert into booked consultations. Pair that with smart Instagram photo tips and your gallery becomes a traffic-generating asset, not just a static page.
Pro Tip: Use a posing guide printed on a laminated card near your photo station. It should show illustrated examples of each required angle so any trained staff member can replicate positioning accurately.
Storing, organizing, and editing images: legal and practical steps
With your images captured, the next critical step is organizing, editing, and protecting them responsibly. This is where many med spas make mistakes that could cost them significantly.
Use HIPAA-compliant storage. Never store patient photos on a personal phone, a standard Google Drive, or Dropbox without a Business Associate Agreement in place. Choose platforms explicitly marketed as HIPAA-compliant, such as encrypted cloud services with audit logging. Your practice management software may already offer compliant photo storage. Check with your vendor before assuming.
Here’s a practical file-naming convention you can implement today:
- Use patient ID numbers, never patient names, in file names
- Include the treatment code and date in the file name (example: PT4821_Botox_20260315_Front)
- Create folders organized by treatment type, then by year and month
- Archive each patient’s full photo series together in one subfolder
This system makes it fast to pull up any patient’s complete photo history, which matters during consultations and for your marketing review process.
Editing rules are stricter than most owners expect. HIPAA authorization is only the beginning of your compliance obligation. The FTC also has a say. FTC guidelines require that before-and-after photos represent typical results, with clear and conspicuous disclaimers when they don’t, and prohibit misleading edits beyond basic adjustments. That means you can correct white balance, adjust brightness, or crop for framing. You cannot remove wrinkles digitally, smooth skin texture artificially, or change body contours in any way.
“Any editing that alters the patient’s actual appearance, even subtly, creates liability under FTC advertising rules. Results shown must be achievable and representative of what most patients can expect.”
This is especially important when using online review tips to build credibility because your photo gallery and your reviews work together to create an overall trust picture. If one element feels exaggerated, it undermines the other.
Pair your photo library with a solid editorial calendar using content ideas for engagement to maximize the reach of every image you’ve worked hard to capture. A single compliant, high-quality photo can be used across your website, email campaigns, and social media with the right strategy.
Building and showcasing your gallery: design and marketing essentials
After organizing your images, you’re ready to display them effectively and maximize their impact. This is the step where your hard work translates directly into bookings.
Follow this process to build your gallery page:
- Create a dedicated gallery page on your website. Don’t bury your photos inside individual service pages where they’re hard to find. A standalone gallery page that’s linked from your main navigation makes it easy for visitors to explore.
- Organize by treatment category. Group images under headings like Botox, Filler, Laser Skin Resurfacing, and Body Contouring. Visitors looking for a specific service should find relevant results within seconds.
- Add a disclaimer to every image. FTC requirements mean that if your photos don’t represent typical results, you must say so clearly. Even if they do represent typical results, adding a brief disclaimer like “Individual results may vary” protects you and sets realistic expectations.
- Write brief captions for each photo set. Include the treatment name, number of sessions if relevant, and any context that helps visitors understand what they’re seeing. A caption like “Botox, two treatment sessions, 90 days post-treatment” is informative and builds credibility.
- Optimize images for web performance. Large uncompressed images will slow your page load time significantly. Compress images to under 200KB each without visible quality loss. Slow galleries frustrate visitors and hurt your search rankings.
Beyond your website, use your gallery strategically:
- Share individual before-and-after sets in social media posts with proper disclaimers in the caption
- Feature a “result of the month” spotlight in your email newsletter
- Embed gallery images into service-specific landing pages to reinforce treatment outcomes
- Use gallery content in paid ad creatives after confirming consent covers paid advertising placements
Pro Tip: Use captions with disclaimers and treatment context on every single image in your gallery. Visitors who understand what they’re looking at are far more likely to book a consultation than visitors who just see unexplained photos. Context converts.
Strong reputation management strategies integrate your photo gallery with your review collection process. When a patient sees their own results and feels proud, that’s the perfect moment to ask for a review. Your gallery and your reviews reinforce each other in a powerful loop that builds long-term trust.
A smarter approach to compliant med spa photo galleries
Here’s an insider perspective: most med spas treat compliance as a burden and marketing as the goal, keeping the two entirely separate. That’s exactly backwards. Compliance is your marketing advantage when it’s done right.
A gallery full of properly consented, accurately labeled, contextually captioned photos signals something that no amount of ad spend can replicate: integrity. Today’s aesthetic clients are savvier than ever. They’re researching treatments on TikTok, reading Reddit threads, and cross-referencing multiple providers before they commit. When your gallery shows honest, representative results with clear disclaimers and transparent treatment details, it stands out powerfully against competitors posting aspirational, context-free images.
The med spas winning right now aren’t necessarily the ones with the most dramatic results. They’re the ones whose entire digital presence, including their galleries, communicates trustworthiness at every touchpoint. Staying ahead of med spa marketing trends means understanding that authenticity and compliance aren’t obstacles to great marketing. They are the marketing.
Build your workflow around compliance first and the quality will follow naturally. When your team knows the exact protocol, executes it consistently, and stores everything properly, you create a gallery asset that compounds in value over time.
Effortlessly upgrade your med spa photo gallery experience
Ready to make your gallery a competitive advantage? Here’s how you can get help implementing these solutions. At Aesthetic Brink Lab, we specialize in building the systems med spas need to turn their photo galleries into booking engines. Our professional web design team builds gallery pages optimized for conversion and compliance, making sure your images are displayed in a way that earns trust fast. We also integrate med spa automation to streamline consent collection and photo management workflows, so your team spends less time on admin and more time on clients. Pair that with our lead generation ideas and your gallery becomes a front-line sales tool working around the clock.
Frequently asked questions
Do I need patient consent for every photo I use in my gallery?
Yes, you must obtain explicit written consent for each patient image, even if you already have a treatment consent on file. HIPAA authorization for marketing photos must be separate, platform-specific, and revocable at any time.
What editing is allowed for before-and-after med spa photos?
You can adjust lighting, color balance, or crop an image, but you cannot make changes that alter the patient’s actual appearance. FTC rules prohibit misleading edits and require disclaimers when results aren’t typical.
What equipment do I need for high-quality med spa photos?
A DSLR or mirrorless camera, tripod, professional lighting, a fixed lens, and a consistent background are the core requirements. Clinical photography standards also recommend color reference cards for accurate skin tone representation.
Where should I showcase my med spa photo gallery for best results?
Feature your gallery prominently on a dedicated website page linked from your main navigation, and share individual results across social media and email with proper disclaimers attached to every post.